
with pandas, you’ve in all probability came across this traditional confusion: must you use loc or iloc to extract information? At first look, they give the impression of being nearly an identical. Each are used to slice, filter, and retrieve rows or columns from a DataFrame — but one tiny distinction in how they work can fully change your outcomes (or throw an error that leaves you scratching your head).
I bear in mind the primary time I attempted choosing a row with df.loc[0] and puzzled why it didn’t work. The rationale? Pandas doesn’t all the time “suppose” by way of positions — typically it makes use of labels. That’s the place the loc vs iloc distinction is available in.
On this article, I’ll stroll by means of a easy mini challenge utilizing a small pupil efficiency dataset. By the top, you’ll not solely perceive the distinction between loc and iloc, but additionally know precisely when to make use of every in your personal information evaluation.
Introducing the dataset
The dataset comes from ChatGPT. It accommodates some fundamental pupil examination rating data. Right here’s a snapshot of our dataset
import pandas as pd
df = pd.read_csv(‘student_scores.csv’)
df
Output:
I’ll attempt to carry out some information extraction duties utilizing loc and iloc, like
- Extracting a single row from the DataFrame
- Extracting a single worth
- Extracting a number of rows
- Slicing a spread of rows
- Extracting particular columns and
Boolean Filtering
First, let me briefly clarify what loc and iloc are in Pandas.
What’s loc and iloc
Loc and iloc are information extraction strategies in Pandas. They’re fairly useful for choosing information from data.
Loc makes use of labels to retrieve data from a DataFrame, so I discover it simpler to make use of. Iloc, nonetheless, are useful for a extra exact retrieval of data, as a result of iloc selects information based mostly on the integer positions of the rows and columns, much like how you’d index a Python listing or array.
However when you’re like me, you could be questioning. If loc is clearly simpler due to row labels, why hassle utilizing iloc? Why hassle making an attempt to determine row indexes, particularly when you’re coping with massive datasets? Listed here are a few causes.
- Quite a lot of occasions, datasets don’t include neat row indexes (like 101, 102, …). As a substitute, you could have a plain index (
0, 1, 2, …), otherwise you may misspell row labelling when retrieving data. On this case, you’re higher off utilizing iloc. Later on this article, it’s one thing we’ll be addressing additionally. - In some situations, like machine studying preprocessing, labels don’t actually matter. You solely care a few snapshot of the information. For example, the primary or final three data. iloc is absolutely useful on this state of affairs.
ilocmakes the code shorter and fewer fragile, particularly if labels change, which may break your machine studying mannequin - Quite a lot of datasets have duplicate row labels. On this case,
ilocall the time works since positions are distinctive. - The underside line is, use loc when your dataset has clear, significant labels and also you need your code to be readable.
- Use iloc once you want position-based management, or when labels are lacking/messy.
Now that I’ve cleared the air, right here’s the essential syntax for loc and iloc under:
df.loc[rows, columns]
df.iloc[rows, columns]
The syntax is just about the identical. With this syntax, let’s attempt to retrieve some data utilizing loc and iloc.
Extracting a single row from the DataFrame
To make a correct demonstration, let’s first change the column index and make it student_id. At the moment, pandas is auto-indexing:
# setting student_id as index
df.set_index('student_id', inplace=True)
Right here’s the output:

Seems higher. Now, let’s attempt to retrieve all of Bob’s data. Right here’s methods to method that utilizing loc:
df.loc[102]All I’m doing right here is specifying the row label. This could retrieve all of Bob’s data.
Right here’s the output:
title   Bob
math    58
english 64
science 70
Identify: 102, dtype: object
The cool factor about that is that I can drill down, kinda like a hierarchy. For example, let’s attempt to retrieve particular data about Bob, like his rating on math.
df.loc[102, ‘math’]The output could be 58.
Now let’s do this utilizing iloc. In case you’re aware of lists and arrays, indexing all the time begins at 0. So if I need to retrieve the primary report within the DataFrame, I’ll need to specify the index 0. On this case, I’m making an attempt to retrieve Bob, which is the second row in our DataFrame — so, on this case, the index could be 1.
df.iloc[1]We’d get the identical output as above:
title   Bob
math    58
english 64
science 70
Identify: 102, dtype: object
And if I attempt to drill down and retrieve the mathematics rating of Bob. Our index would even be 1, provided that math is on the second row
df.iloc[1, 1]The output could be 58.
Alright, I can wrap this text up right here, however loc and iloc supply some extra spectacular options. Let’s speed-run by means of a few of them.
Extract A number of Rows (Particular College students)
Pandas means that you can retrieve a number of rows utilizing loc and iloc. I’m gonna make an indication by retrieving the data of a number of college students. On this case, as an alternative of storing a single worth in our loc/iloc methodology, we’d be storing a listing. Right here’s how you are able to do that with loc:
# Alice, Charlie and Edward's data
df.loc[[101, 103, 105]]
Right here’s the output:

And right here’s how to do this with iloc:
df.iloc[[0, 2, 4]]We’d get the identical output:

I hope you’re getting the cling of it.
Slice a Vary of Rows
One other useful characteristic Python Pandas provides is the power to slice a spread of rows. Right here, you may specify your begin and finish place. Right here’s the syntax for loc/iloc slicing:
df.loc[start_label:end_label]In loc, nonetheless, the top label could be included within the output — fairly totally different from the default Python slicing.
The syntax is identical for iloc, with the exception that the top label could be excluded from the output (identical to the default Python slicing).
Let’s stroll by means of an instance:
I’m making an attempt to retrieve a spread of scholars’ data. Let’s attempt that utilizing loc:
df.loc[101:103]Output:

As you may see above, the top label is included within the end result. Now, let’s attempt that utilizing iloc. In case you recall, the primary row index could be 0, which might imply the third row could be 2.
df.iloc[0:3]Output:

Right here, the third row is excluded. However when you’re like me (somebody who questions issues lots), you could be questioning, why would you need the final row to be excluded? In what situations would that be useful? What if I informed you it truly makes your life simpler? Let’s clear that up actual fast.
Assuming you need to course of your DataFrame in chunks of 100 rows every.
If slicing have been inclusive, you’d need to do some awkward math to keep away from repeating the final row.
However as a result of slicing is unique on the finish, you are able to do this fairly simply, like so.
df.iloc[0:100] # first 100 rows
df.iloc[100:200] # subsequent 100 rows
df.iloc[200:300] # subsequent 100 rows
Right here, there can be no overlaps, and there can be constant chunk sizes. One more reason is the way it’s much like how ranges work in Pandas. Often, once you need to retrieve a spread of rows, it additionally begins at 0 and doesn’t embrace the final row. Having this similar logic in iloc slicing is absolutely useful, particularly once you’re engaged on some net scraping or looping by means of a spread of rows.
Extract Particular Columns (Topics)
I’d additionally like to introduce you to the colon : signal. This lets you retrieve all data in your DataFrame utilizing loc. Just like the * in SQL. The cool factor about that is you can filter and extract a subset of columns.
That is normally the place I discover myself beginning. I take advantage of it to get an summary of a selected dataset. From there, I can begin to filter and drill down. Let me present you what I imply.
Let’s retrieve all data:
df.loc[:]Output:

From right here, I can extract particular columns like so. With loc:
df.loc[:, [‘math’, ‘science’]]Output:

With iloc:
df.iloc[:, [2, 4]]The output could be the identical.
I really like this characteristic as a result of it’s so versatile. Let’s say I need to retrieve Alice and Bob’s math and science scores. It’ll go one thing like this. I can simply specify the vary of data and columns I would like.
With loc:
df.loc[101:103, ['name', 'math', 'science']]Output:

With iloc:
df.iloc[0:3, [0, 1, 3]]We’d get the identical output.
Boolean Filtering (Who scored above 80 in Math?)
The ultimate characteristic I need to share with you is Boolean filtering. This permits for a extra versatile extraction. Let’s say I need to retrieve the data of scholars who scored above 80 in Math. Often, in SQL, you’ll have to make use of the WHERE and HAVING clauses. Python makes this really easy.
# College students with Math > 80.
df.loc[df['math'] > 80]
Output:

You can too filter on a number of situations utilizing the AND(&), OR(|), and NOT(~) operators. For example:
# Math > 70 and Science > 80
df.loc[(df[‘math’] > 70) & (df[‘science’] > 80)]
Output: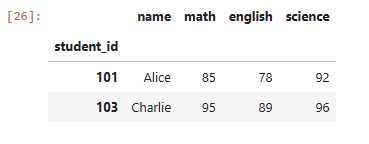 P.S. I wrote an article on filtering with Pandas. You possibly can learn it here
Often, you’ll end up utilizing this characteristic with loc. It may get a bit difficult with iloc, because it doesn’t help Boolean situations. To do that with iloc, you’ll need to convert the Boolean filtering into a listing, like so:
# College students with Math > 80.
df.iloc[list(df['math'] > 80)]
To keep away from the headache, simply go together with loc.
Conclusion
You’ll in all probability use the loc and iloc strategies lots once you’re engaged on a dataset. So it’s essential to understand how they work and distinguish the 2. I really like how straightforward and versatile it’s to extract data with these strategies. Everytime you’re confused, simply bear in mind loc is all about labels whereas iloc is about positions.
I hope you discovered this text useful. Strive working these examples by yourself dataset to see the distinction in motion.
I write these articles as a approach to check and strengthen my very own understanding of technical ideas — and to share what I’m studying with others who could be on the identical path. Be happy to share with others. Let’s be taught and develop collectively. Cheers!
Be happy to say hello on any of those platforms